Ashley Riley: Everyday Makeup: Makeup, Beauty and Style
Showing posts with label Everyday Makeup. Show all posts

November 01, 2016

EVERYDAY LONG LASTING Makeup Routine & Tutorial | Tips for ALL Skin Types!

EVERYDAY LONG LASTING Makeup Routine & Tutorial | Tips for ALL Skin Types!

Unless you are a beauty blogger or vlogger, the average person does not have many days of the year where they get "glammed up."  Usually you fall into an everyday makeup routine, finding and sticking to your favorite products, and never stray too far from your trusted brands.

My everyday makeup routine changes by the season, sometimes by the month.  As a YouTuber and Beauty Blogger, I am always finding and using new and upcoming products, incorporating them into my makeup routine as a method of "putting them to the test."

My penchant for trying new products, and subsequent makeup addition, has lead me to this: my go-to everyday long lasting makeup routine.  I choose products for those days I know I will be out that won't leave my normal-to-oily skin looking like a greased hamburger at the end of the day.

In this video I also give some tips and tricks for choosing shades of makeup for different skin tones, including highlight, blush, and bronzer, and how to achieve that natural, fresh and matte everyday look!


Snap Me! AshleyEBeauty
EVERYDAY LONG LASTING Makeup Routine & Tutorial | Tips for ALL Skin Types!

October 19, 2016

FULL FACE of UNDER $10 Makeup & Brushes | DRUGSTORE Makeup Tutorial


Today's tutorial is one that I have been wanting to post for a very, very long time! Every makeup product and makeup brush used in this tutorial is under $10.  I found the best drugstore and affordable makeup and brushes and put them into this all-in-one easy makeup tutorial

Don't have extra money to spend on high-end makeup purchases?  There's no need when there are so many high quality and affordable products.  You can easily achieve the look of high-end products with cheaper makeup and brushes.

Will I admit that there are a lot of not-so-great drugstore and affordable products out there?  Heck yes.  I have tried some drugstore products that I thought weren't nearly worth even their affordable price.  However, I've gone through a good share of the drugstore makeup on the market, and there are always gems in the rough.  You do not need to spend hundreds, even thousands of dollars, at Sephora (unless, of course, you really want to!), in order to achieve this beautiful everyday makeup look.


Snap Me! AshleyEBeauty

Product Empties | Items I've Completely Used Up!

September 14, 2016

Romantic Soft Pink Makeup Tutorial

Romantic Soft Pink Makeup Tutorial

This romantic soft pink makeup tutorial is one of my favorite makeup looks to do.  It is super simple and easy to achieve, and shades of pink look amazing on many different skin tones.  This look is soft and girly, yet sexy at the same time.  It is perfect for both the warm days of spring and summer, and the cooler days of fall.

Full disclaimer: the struggle with my eyeliner during this tutorial was real.  Despite applying tape to either sides of my eyes for a nice crisp and clean liner, I still managed to make one side much thicker and longer than the other.  Of course, I had to compensate, and did the only thing I could do with waterproof liner that didn't include ruining my makeup, which was to make the other perfect side longer and thicker as well. Sigh. #FirstWorldStruggles


Snap Me! AshleyEBeauty 

Romantic Soft Pink Makeup Tutorial

December 14, 2015

How To Do a Simple Everyday Eye Contour and Makeup Tutorial

How To Do a Simple Everyday Eye Contour and Makeup Tutorial

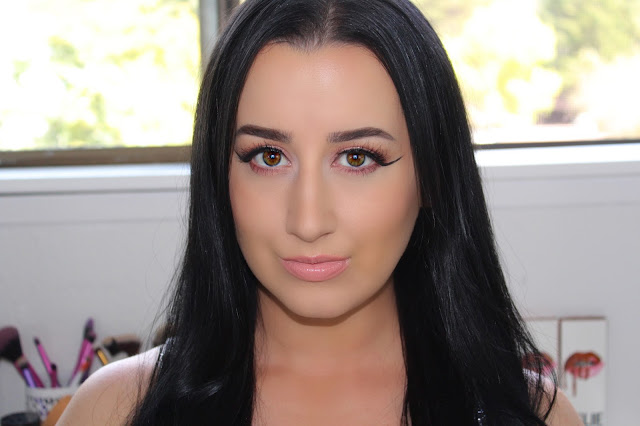
This simple everyday look is a blend of neutral tones for an easy eye contour, paired with a natural peachy pink lip.  I use makeup and beauty basics in my daily makeup routine and this is my go to look.  A quick and basic eye contour can make you look put together and wide awake.  It is made to emphasize natural beauty and still cover imperfections, all while being a routine easy enough that I can do it as quickly as possible while rushing out the door to work in the morning.

Let's get started!

The Face

Prime, Foundation and Conceal

Starting with the basics: I moisturize my face with Clinique Dramatically Different Moisturizing Cream and my under eye area with Origins GinZing Refreshing Eye Cream.  I prime my skin with NYX Angel Veil Skin Perfecting Primer and prime my under eye area with ELF Studio Hydrating Under Eye Primer.  Using a Beauty Blender, I apply a Maybelline Fit Me Foundation in Soft Tan to my entire face.  To highlight and conceal I use the Urban Decay Naked Skin Weightless Concealer in Light Warm in a V-shape beneath my eyes, in the middle of my forehead, down the bridge of my nose, on my chin, and on my eye lids.

Highlight, Contour and Blush

To set everything I take the Real Techniques Setting Brush and place a mixture of the highlight shades Lucid and Lyric from the Kat Von D Shade and Light Contour Palette and place a generous amount over the areas that I highlighted with concealer.  I also add a generous amount to my jaw directly below my contour line.  I allow the extra powder to sit on my skin for a few minutes to "bake" before brushing off with a Morphe Brushes G23 Soft Fan Brush.

With the Real Techniques Sculpting Brush I take the contour shade Sombre from the Kat Von D palette and contour beneath my cheekbones, underneath my jaw bone, along the hairline on my forehead, down my temples, and alone the parallel sides of the bridge of my nose.  After blending I apply the NARS Blush in Sex Appeal, a soft matte pink, using the BH Cosmetics Blush Brush.

Highlight and Brows

Using the same fan brush as earlier, I then apply the Jaclyn Hill and Becca Highlight in Champagne Pop to the tops of my cheekbones, my forehead just above my brows, and the bridge of my nose.  I highlight over this with the first highlight color from the Carli Bybel by BH Cosmetics Palette, a shimmery frosted pink.


How To Do a Simple Everyday Eye Contour and Makeup Tutorial
The Eyes

Transition Shade

Using the Tartelette Amazonian Clay Matte Eyeshadow Palette, I take the Wanderer, a light brown, with a BH Cosmetics Fluffy Blending Brush into the crease of my eye and start blending upward.  This is going to be our transition shade.

Crease and Lid

I then apply the shade Power Player, a taupe, directly into my crease with a BH Cosmetics Small Tapered Blending Brush using windshield wiper motions.  I reapply this color a couple times to build the color, making sure it blends into my transition shade but stays directly within the crease.

Using the shade Wanderer again I take the shade all across my lid and to my outer corner.

Outer Corner and Wing

I use the shade Multi-tasker, a chocolate brown, to define my outer corner.  I apply this directly to the outer third of my eye lid with a BH Cosmetics Tapered Blending Brush in the shape of a sideways "V." While I make sure to concentrate the color only to this area, I take it up into my crease and down into my lower lash line ever so slightly so as to enhance the smokey effect

Instead of using a gel liner (because this is an everyday look), I take the shade Fashionista, a soft black, with a BH Cosmetics Small Eye Defining Brush and carefully darken just the very bottom of my outer corner.

Highlight and Lower Lash Line

I then use the shade Shimma Shimma by Makeup Geek, a metallic champagne, to highlight the inner tear duct with a BH Cosmetics Fluffy Blending Brush, and a small flat shadow brush to highlight my brow bone just below my eyebrow.

Finally, I take the shade Power Player again and glide it below my bottom lash line using a small eye defining brush, making sure to blend into the outer corner of my eye to give the entire look a rounded out eye.  I go over the bottom half of Power Player with our original transition shade, Wanderer, to blend out any harshness.

Mascara and Falsies

I apply Diorshow Maximizer Lash Plumping Serum and Diorshow Mascara to my upper and lower lashes.  For my falsies I choose Morphe Brushes Premium Lashes #307, which are easy for everyday use, and apply them using Duo Eyelash Glue Adhesive.

How To Do a Simple Everyday Eye Contour and Makeup Tutorial

The Lips

For this look I wanted something that was wearable in texture and color.  I apply the ColourPop Ultra Matte Liquid Lipstick in Donut, a perfectly wearable shade of bright peach.

I set the entire look with the Mario Badescu Facial Setting Spray.

Let Me Know!

Tell me your favorite products to use for an everyday makeup look!


Are you an AEB Babe? Subscribe to the newsletter!
Enter your e-mail address:

Powered by FeedPress