This shop has been compensated by Collective Bias, Inc. and its advertiser. However, all opinions are 100% my own and I do not feature products that I do not truly love and support. The trust and support of my readers are always my number one priority. #MNYLooksToLove #CollectiveBias.
This
tutorial will show how you can take your everyday work makeup and
transform it into fresh and sophisticated Valentine's Day date night
makeup within minutes. After creating a Valentine's Day Rose Pink and Gold Makeup Tutorial, I knew I had to go back to Walmart and grab some more great Maybelline products to create an easy Work-to-Date makeup tutorial for all those hard working girl bosses.




Before Work: The Face
Primer, Foundation and Concealer
1. I moisturize my face with a hydrating face cream and my under eye area with a refreshing and cooling eye cream.
2. I prime my skin with an oil-free face primer.
3. Using a blender I apply foundation to my entire face. This foundation is a gel-whipped formula that gives me the perfect medium coverage and velvety soft finish.
4. To highlight and conceal I use a light and warm tone concealer in a V-shape beneath my eyes, in the middle of my forehead, down the bridge of my nose, on my chin, and on my eye lids.
2. I prime my skin with an oil-free face primer.
3. Using a blender I apply foundation to my entire face. This foundation is a gel-whipped formula that gives me the perfect medium coverage and velvety soft finish.
4. To highlight and conceal I use a light and warm tone concealer in a V-shape beneath my eyes, in the middle of my forehead, down the bridge of my nose, on my chin, and on my eye lids.
Powder Setting and Contour
1. To set
everything I take a setting brush with yellow tone powder highlight shade and place a generous amount over the areas that I highlighted with
concealer.
2. I also add a generous amount to my jaw directly below my contour line. I allow the extra powder to sit on my skin for a few minutes to "bake" before brushing off with a soft fan brush.
2. I also add a generous amount to my jaw directly below my contour line. I allow the extra powder to sit on my skin for a few minutes to "bake" before brushing off with a soft fan brush.
3. I take a cool tone contour shade from the contour
beneath my cheekbones, underneath my jaw bone, along the hairline on my
forehead, down my temples, and alone the parallel sides of the bridge of
my nose.
Blush and Highlight
1. Using a blush brush, I apply a light pink blush shade to the apples of my cheeks and take it back over my contour line.
2. Using
the same fan brush as earlier, I then apply a shimmer highlight shade to the tops of my cheekbones, my forehead just above my brows, and
the bridge of my nose.
Brows
1. I shape my brows with an eye pencil in a dark brown/black shade.
2. I fill it in
with a dark brown brow powder.
3. Finally, I set my brows into place with a clear brow gel.


After Work: The Eyes
Primer and Transition Shade
1. First, I prime my eyes with an eyeshadow primer potion.
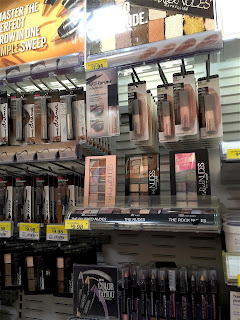
2. Using Maybelline's The Rock Nudes Palette, I take the matte beige shade with a fluffy blending brush into the crease of my eye and start blending upward. This is going to be our transition shade. I absolutely love the pigmentation of the shades in this palette, and the versitility of makeup looks that can be created.
Crease, Lid and Outer Corner
1. Continuing with The Rock Nudes Palette, I then apply a matte light grey shade directly into my crease with a small tapered blending brush
using windshield wiper motions. I reapply this color a couple times to
build the color, making sure it blends into my transition shade but
stays directly within the crease.
2. Staring in my inner corner and using a flat shadow brush I take the The Rock Nude Palette's soft shimmer nude shade and apply it across my lid from corner to corner. I do not take this shade any higher than my crease shade.
2. Staring in my inner corner and using a flat shadow brush I take the The Rock Nude Palette's soft shimmer nude shade and apply it across my lid from corner to corner. I do not take this shade any higher than my crease shade.
3. Staring in my outer corner and using a tapered crease brush, I apply The Rock Nude Palette's matte deep purple shade. I apply this to the outer 1/3 of my lid and softly blend this into the soft shimmer nude lid shade to eliminate any harshness.
4. I also take the deep purple outer corner shade outward slightly to where I would normally be drawing my wing line, and then very carefully into my crease about 2/3 across my lid.
4. I also take the deep purple outer corner shade outward slightly to where I would normally be drawing my wing line, and then very carefully into my crease about 2/3 across my lid.
Highlight
1. I use The Rock Nude Palette's white shimmer shade to highlight the inner tear duct with a fluffy blending brush.
2. I also take the this white shimmer shade on a small flat shadow brush and highlight my brow bone just below my eyebrow.
2. I also take the this white shimmer shade on a small flat shadow brush and highlight my brow bone just below my eyebrow.
Lower Lash Line and Mascara
1. Using a small flat shadow brush I take my crease shade and place this under my entire lower lash line as close to the line as I can.
2. I then go in with our outer
corner shade and concentrate this color on the outer 1/3
of my lower lash line. This gives the entire eye look a nice and rounded smoky effect.
3. I go back in with the original transition shade and glide this beneath my lower lash line shades in order to soften any harshness.
4. In order to make my eyes look open, awake and bigger I take Maybelline's Lasting Drama Waterproof Gel Eyeliner Pencil in Soft Nude and glide this along my lower water line. I can count on this long lasting formula to make sure my liner stays put throughout my Valentine's Day date night.
3. I go back in with the original transition shade and glide this beneath my lower lash line shades in order to soften any harshness.
4. In order to make my eyes look open, awake and bigger I take Maybelline's Lasting Drama Waterproof Gel Eyeliner Pencil in Soft Nude and glide this along my lower water line. I can count on this long lasting formula to make sure my liner stays put throughout my Valentine's Day date night.
5. I apply Maybelline's The Falsies Push Up Drama Mascara in the shade Blackest Black to my upper and lower lashes. This gives my lashes extreme push up volume and the illusion that I am wearing false lashes (but without the hassle of lash glue!).

After Work: The Lips
For this look I wanted a bright color that would look festive for Valentine's Day but still sophisticated for a date night out.
1. I line and fill in my lips with Maybelline's Vivid Matte Liquid Lips in Pink Charge, a gorgeous bright pink shade.
2. I set the entire makeup look with a facial setting spray that will keep my makeup looking great and lasting all night long.

Sometimes fab and glamorous makeup looks can take time, but this one absolutely proves that this does not always need to be the case. This fun makeup look can be done in minutes and take your workday makeup up a notch for an amazing Valentine's Day date night.
I Want To Know...
What are your date plans for Valentine's Day? Are you going out or staying in?


Are you an AEB Babe? Sign up for the newsletter!
Powered by FeedPress
This shop has been compensated by Collective Bias, Inc. and its advertiser. However, all opinions are 100% my own and I do not feature products that I do not truly love and support. The trust and support of my readers are always my number one priority. #MNYLooksToLove #CollectiveBias.
This shop has been compensated by Collective Bias, Inc. and its advertiser. However, all opinions are 100% my own and I do not feature products that I do not truly love and support. The trust and support of my readers are always my number one priority. #MNYLooksToLove #CollectiveBias.